The Steps
ALWAYS: WEAR EYE PROTECTION!
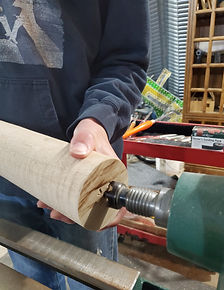
Step one- Assuming you have all of your materials, take your maple or ash blank and put an X in the ends. Do your best to try to find the middle, it is okay if you did not find the exact center point. Use your compass to find the center point. Put the pointy end on the outside of the blank and swing the pencil end to make a crescent on the end of the blank. Move this about ½ inch every time until you make it all the way around the blank. This should show you where the center point is. Do this same step on the other side. HINT: if your blank is bigger than your lathe, cut your blank to a size where it fits on the lathe so you don’t have to find the center again.
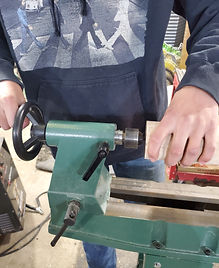
Step two- Put your blank into the lathe and tighten it until it is difficult to turn. This will keep the bat in place while you're turning. Get out your scribe and go down one of two paths. Path one is the eye path. Shave away wood and put your scribe up to it to see how much you have left to go. You need to know how quickly you're taking off wood so you do not overshoot. Path two is the copy cat path. This path you will need to use a caliper. First find a spot on your scribe to copy, then use the caliper to measure the scribe and then use a parting tool to dive down into the same spot on the blank as on the scribe. Continue doing that same step all the way down the bat 4in. apart. I Prefer to use both techniques, but try to have one that you like and are better at in case you are in a tight spot. This step will take a while, but it is very important to take your time. DO NOT: Wear loose clothing or have strings from a sweatshirt hanging over your work piece.
Step three: Rounding the bat. To round the ends of your bat, take your skew chisel and lightly shift it on the end of the bat until you find what you like. Making bats is all about what you like. You must also round the bat. It sounds weird if you think about rounding the bat if that has been what you were doing the entire time before that, but as you take wood off. The bat starts to shake while you are turning. This all depends on which type of lathe you use. All you have to do for this step is go across the bat with your skew chisel until it is smooth.
Step four- This step is all about sanding your bat. You can use any style of sandpaper, but you need the right grit. You want to start with the heaviest grit you have. You should know that the heavier grit has a lower number. What you will do is turn on your lathe and slide the sandpaper back and forth on the bat until you think that it has taken out all of the small chips in the bat. Depending on the wood you may have none or a lot more than you wanted. If you did not get all of them do not worry. Now you need to keep the lathe turned off for a little bit and hand sand the “lathe lines” out. Lathe lines are lines left in the bat by the turning tools and the sandpaper. When you're hand sanding your bat you must remember to go with the grain of the bat. If you look at your bat you will see that there are lines going up the handle and making its way to the barrel. That is the grain of your bat. Once you are finished with the heaviest grit continue this hole step but with the next heaviest grit sandpaper. Continue until you reach the 400 grit mark. So you have done 40, 80, 120, and 400 grit sandpaper.
Step five: Once you have finished sanding you now need to cut the ends off of your bat. Make sure you know what you're doing or you could become seriously injured. If you are not familiar with how to cut wood with a table saw, have an adult help you. After you cut the ends of your bat use a random orbit sander to smooth out the edges. I suggest using 80 or 120 grit.
Step five: Once you have finished sanding you now need to cut the ends off of your bat. Make sure you know what you're doing or you could become seriously injured. If you are not familiar with how to cut wood with a table saw, have an adult help you. After you cut the ends of your bat use a random orbit sander to smooth out the edges. I suggest using 80 or 120 grit.
Step six- (OPTIONAL) now you must add stain, to add stain you must use a rag to apply. I suggest using shop rags. They are meant for stuff like this. It does not matter how much you put on. The more the better. Once you cover the entire bat, wipe the access off and let the bat sit for 24 hours before applying varnish. You can make a holder for your bat to hold your while it dries.
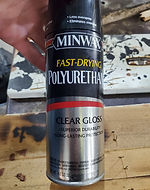
Step seven-(NOT OPTIONAL) Now you must apply the varnish. If you do not know what varnish is it is a sealer to keep the wood strong. You can buy glossy varnish in a spray can which is super helpful for a bat. Just spray your bat, making sure you read the directions in the bottle to see how far away you must spray it from. You must wait 24 hours to apply the next coat. Sand lightly with steel wool, wipe down with a tack cloth, then add your next coat. Do this three times and your bat is done. (YOU MUST WAIT ONE DAY AFTER FINAL COAT UNTIL FIRST USE)
Conclusion- The main steps to making a bat are the setup, the lathing, the sanding, and the finishing. When you are finished your end result should look like, well a baseball bat. You will get much better at lathing with practice. This skill is useful for sharing knowledge in the woodworking world. It is very interesting to learn about.